
시작하기 전, jstl 을 사용하려면 https://tomcat.apache.org/download-taglibs.cgi
Apache Tomcat® - Apache Taglibs Downloads
Welcome to the Apache Taglibs download page. This page provides download links for obtaining the latest version of the Apache Standard Taglib, as well as links to the archives of older releases. You must verify the integrity of the downloaded files. We pro
tomcat.apache.org
tomcat 홈페이지 > Download 의 Taglibs > Jar Files 의 Impl, Spec 파일 다운로드 받아
이클립스의 WEB-INF > lib 폴더 안에 넣음
- 교재 294, 295 페이지 참고
01taglib
jstl 이 제공하는 태그 5개 중 코어를 가장 많이 사용함
어떤 태그를 사용할 지 코드 상단에 명시해야 함 ↓
<%@ taglib prefix="c" uri="http://java.sun.com/jsp/jstl/core" %>
("http://java.sun.com/jsp/jstl/core" 키로 작성된 prefix)
02if
<h1>jstl core if</h1>

<c:if test="">
	<p>출력됨1</p>
</c:if>

<c:if test="true">
	<p>출력됨2 true 키워드</p>
</c:if>

<c:if test="<%= 3 == 3 %>">
	<p>출력됨3 expression</p>
</c:if>

<c:if test="${3 == 3 }">
	<p>출력됨4 expression language(el)</p>
</c:if><c:if></c:if>: 안의 content 가 만족할 때 실행됨
<c:if test=""></c:if>: test="" 안의 값이 true 여야 출력됨
expression 코드 사용가능
<c:if test="<%= 3--3 %>">el 코드 사용가능
<c:if test="${4 == 4}">03if
<c:if test="${param.food eq 'apple' }">
	<p>사과</p>
</c:if>param.food 으로...
쿼리스트링으로 ?food=apple 입력하면 사과 출력됨
04if
<h1>name 파라미터가 있으면 </h1>
<c:if test="${not empty param.name }"> <%-- ! empty param.name --%>
	<p>${param.name }님 반갑습니다.</p>
</c:if>

<h1>name 파라미터가 없으면</h1>
<c:if test="${empty param.name }">
	<p>손님 반갑습니다.</p>
</c:if>

<hr>
<p>
${ empty param.name ? '손' : param.name }님 반갑습니다.
</p>param.name 이 비었는지 안 비었는지 확인, c:if 의 test 로
아니면 아래에서 삼항연산자(?) 로 ㅇㅇ
! 주의 ! jstl 은 else 태그가 없음
05choose
when, otherwise - if, else 와 유사
<h1>choose, when, otherwise</h1>

<c:choose>
	<c:when test="${empty param.name }">
		<p>손님 반갑습니다.</p>
	</c:when>
	<c:otherwise>
		<p>${param.name }님 반갑습니다.</p>
	</c:otherwise>
</c:choose><c:choose> 안에!
<c:when test=""></c:when>
<c:otherwise></c:otherwise>
</c:choose>
06choose
<c:choose>
	<c:when test="${param.age >= 20 }">
		<p>투표가능합니다.</p>
	</c:when>

	<c:otherwise>
		<p>투표 불가능합니다.</p>
	</c:otherwise>
</c:choose>07choose
<c:choose>
	<c:when test="${param.age <= 10 }">
		<p>어린이용</p>
	</c:when>

	<c:when test="${param.age <= 20 }">
		<p>청소년용</p>
	</c:when>

	<c:when test="${param.age > 20 }">
		<p>성인용</p>
	</c:when>

	<c:otherwise>
		<p>입력되지 않았습니다.</p>
	</c:otherwise>
</c:choose>when, when, when, 마지막에 otherwise (if - ifelse - else 처럼)
08form, view
form
<form action="08view.jsp">
	<input type="text" name="name" placeholder="이름">
	<br>
	<input type="number" name="age" placeholder="나이">
	<br>
	<input type="submit" value="전송">
</form>로그인 창, action 로 view 로 보내줌
view
<a href="08form.jsp">다시 입력</a>


<c:choose>
	<c:when test="${empty param.name and empty param.age }">
		<p>정보가 입력되지 않았습니다.</p>
	</c:when>

	<c:otherwise>
		<p>
			<c:choose>
				<c:when test="${empty param.name }">
					손님
				</c:when>
				<c:otherwise>
					${param.name }님
				</c:otherwise>
			</c:choose>

			<c:choose>
				<c:when test="${param.age <= 10 }">
					어린이용 추천
				</c:when>
				<c:when test="${param.age <= 20 }">
					청소년용 추천
				</c:when>
				<c:when test="${param.age > 20 }">
					성인용 추천
				</c:when>
				<c:otherwise>
					나이가 입력되지 않았습니다.
				</c:otherwise>
			</c:choose>
		</p>
	</c:otherwise>
</c:choose>form으로 링크 걸어줌
아래 choose > when, { otherwise > p >(choose > when, otherwise) , (choose > when , when , when , otherwise) }
09if
<h1>if tag</h1>

<c:if test="${param.name == 'donald' && param.age == 22 }" var="mytest" scope="session">
	<h1>트루일 때만 실행</h1>
</c:if>

<p>매우 긴 콘텐츠..</p>

<c:if test="${param.name == 'donald' && param.age == 22 }">
	<h1>트루일 때만 실행2</h1>
</c:if>

<c:if test="${mytest }">
	<h1>트루일 때만 실행3</h1>
</c:if>

<c:if test="${not mytest }">
	<h1>false일때 실행</h1>
</c:if>

<h1>${mytest }</h1>
<h1>${sessionScope.mytest }</h1><c:if> 아까 위에서 처음에 배웠는뎅
대신 이번에는 test 말고도 var="mytest" scope="session"
var="mytest"
scope="page"
scope="request"
scope="session"
scope="application"
- 다른 페이지에서 사용하고 싶을 때, scope="page" 가 기본값
<c:if test="${mytest }"> - 실행됨 그니까 아마도 해당 var 로 돌아가서 거기서 true/false 판단 (즉, 결과가 동일)
<c:if test="${not mytest }"> - 실행되지 않음
${mytest } - 봐봐 위에서 true 를 반환했던 것임
${sessionScope.mytest }
10foreach
<h1>jstl core forEach</h1>
<c:forEach begin="1" end="3">
	<p>반복할 코드1</p>
</c:forEach>

<c:forEach begin="5" end="7">
	<p>반복할 코드2</p>
</c:forEach>

<c:forEach begin="1" end="10" step="2">
	<p>반복할 코드3</p>
</c:forEach>

<c:forEach begin="1" end="10" step="2" var="i">
	<p>${i } : 반복할 코드4</p>
</c:forEach><c:forEach begin="(시작숫자)" end="(끝숫자)"> (반복할 코드) </c:forEach>
→ 시작이 5이고 끝이 7이면 3번 반복됨 = 시작 1, 끝 3이랑 동일
<c:forEach begin="" end="" step="(건너뛰기 숫자)" var="(변수)">
→ step 숫자 마다 한번! var 는 변수이고 반복될 코드에서 쓰임
즉, step 이 2이면, 1, 3, 5, 7, ...
step 이 3이면, 1, 4, 7, 10, ...
11foreach
<h1>foreach - 구구단 2단</h1>
<c:forEach begin="1" end="9" var="i">
	<p>2 X ${i } = ${ 2 * i }</p>
</c:forEach>예제
12foreach-gugudan
<h1>foreach 구구단 n단</h1>
<%--
http://localhost:8080/jsp20211025/12jstl/12foreach-gugudan.jsp?dan=3
dan 파라미터를 사용해서
구구단 출력

empty dan 이면 '단을 입력해주세요'
 --%>


<c:if test="${empty param.dan }" var="emptyDan">
	<p>단을 입력해주세요.</p>
</c:if>

<c:if test="${not emptyDan }" >
	<c:forEach begin="1" end="9" var="i">
		${param.dan } X ${i } = ${param.dan * i } <br>
	</c:forEach>
</c:if>주소 끝에 ?dan=(숫자) 를 이용해, 입력받은 숫자의 구구단을 출력하는 프로그램
만약 dan 이 입력되지 않았으면 단을 입력해주세요
param.dan 이 empty 인지 조사
만약 empty 가 아니면(을 var 로 했음) forEach 로 반복해서 구구단 출력
13foreach-gugudan
<h1>구구단 2~9단 (foreach)</h1>

<c:forEach begin="2" end="9" var="i">
	<h3>${i } 단</h3>
	<c:forEach begin="1" end="9" var="j">
		${i } X ${j } = ${i * j } <br>
	</c:forEach>
	<hr>
</c:forEach>이중으로 해서 구구단 출력하기
for문 이중으로 쓰는거랑 똑같은 방식임
14array
반복과 관련된 array, list 배워볼까?
<h1>foreach - 배열</h1>
<%
pageContext.setAttribute("arr", new String[] {"java", "spring", "mysql", "oracle"});
%>

<c:forEach items="${arr }" var="item">
	${item } <br>
</c:forEach>string 배열 arr = {"java", "spring", "mysql", "oracle"} 저장
<c:forEach items="" var="">
item 값으로 el 작성 ${arr } , var 값으로 이름 지정, forEach 내용으로 해당 이름 el 로 작성

15array-ex
<%
pageContext.setAttribute("list", new String[] {"apple", "melon", "coffee", "milk"});
%>
<ul>
	<c:forEach items="${list }" var="food">
		<li>${food }</li>
	</c:forEach>
</ul><ul>, <li> 로 감싸서 리스트로 표시되도록
16array
배열의 일부분만 - begin, end 사용
<%
pageContext.setAttribute("arr", new String[] {"a", "b", "c", "d", "e", "f"});
%>

<c:forEach begin="2" end="4" items="${arr }" var="item">
	${item } <br>
</c:forEach>

<hr>

<c:forEach begin="2" items="${arr }" var="item">
	${item } <br>
</c:forEach>
<hr>

<c:forEach end="4" items="${arr }" var="item">
	${item } <br>
</c:forEach><c:forEach begin="" end="" items="" var="">
17array
<%
pageContext.setAttribute("array", new String[] {"mvc", "itzy", "asap", "mafia", "spring"});
%>
<ol>
	<c:forEach items="${array }" var="item" begin="1" end="3">
		<li>${item }</li>
	</c:forEach>
</ol>리스트로
18list
<h1>foreach - list</h1>

<%
List<String> list = new ArrayList<>();
list.add("coffee");
list.add("milk");
list.add("beer");
list.add("water");

pageContext.setAttribute("datas", list);
%>

<c:forEach items="${datas }" var="item">
	${item } <br>
</c:forEach>list 에 값 추가, list 를 datas 로 저장
items 값에 ${datas } 넣었음
items="${attribute값 }"
19list-ex
<%
List<String> datas = new ArrayList<>();
datas.add("korea");
datas.add("china");
datas.add("us");
datas.add("uk");
datas.add("france");

pageContext.setAttribute("country", datas);
%>

<ul>
	<c:forEach items="${country }" var="item">
		<li>${item }</li>
	</c:forEach>
</ul>

<hr>

<ul>
	<c:forEach items="${country }" var="item" begin="1" end="3">
		<li>${item }</li>
	</c:forEach>
</ul>datas 라는 이름의 list 생성하여 값들 추가
해당 리스트를 country 로 저장
리스트로 출력
20map
<%
Map<String, String> map = new HashMap<>();
map.put("lang", "java");
map.put("db", "mysql");
map.put("server", "tomcat");
map.put("framework", "spring");
map.put("library", "jquery");
pageContext.setAttribute("data", map);
%>
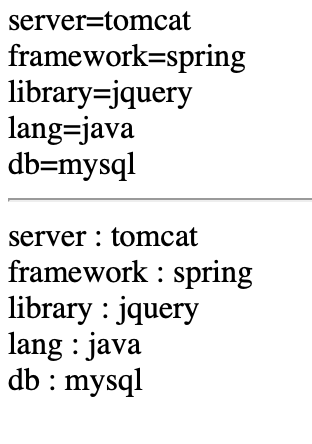
<c:forEach items="${data }" var="entry">
${entry } <br>
</c:forEach>
<hr>
<c:forEach items="${data }" var="entry">
${entry.key } : ${entry.value } <br>
</c:forEach>HashMap map 생성, <key, value> 둘다 문자열
값들 추가
map 을 data 라는 이름으로 저장
foreach 로 값들을 출력
그냥 var 이름을 el 에 써서 출력하면 key=value 로 출력되며,
아래에서 key 따로 value 따로 출력하면 출력되는 형태를 원하는대로 할 수 있다.
따로 출력은 var.key 이런 식으로 했다
21map-ex
<%
Map<String, String> map = new HashMap<>();
map.put("song", "asap");
map.put("food", "choco");
map.put("city", "seoul");

pageContext.setAttribute("datas", map);
%>

<ul>
	<c:forEach items="${datas }" var="item">
		<li>${item.key }</li>
	</c:forEach>
</ul>

<ul>
	<c:forEach items="${datas }" var="data">
		<li>${data.value }</li>
	</c:forEach>
</ul>HashMap map에 값들 저장
map을 datas의 이름으로 저장
리스트로 출력 key, value - var 는 그냥 다르게 쓴거라서 의미 없음
22varStatus
<head>
<style>
	table, td, th {
		border: 1px solid black;
	}
	table {
		width: 100%;
		border-collapse: collapse;
	}
</style>
</head>
<body>
<%
pageContext.setAttribute("list", new String[] {"rm", "jimin", "jin", "v"});
%>

<c:forEach items="${list }" var="item" varStatus="status">
	${item } <br>
</c:forEach>

<hr>
<table>
	<tr>
		<th>item</th>
		<th>index</th>
		<th>count</th>
		<th>begin</th>
		<th>end</th>
		<th>step</th>
		<th>first</th>
		<th>last</th>
		<th>current</th>
	</tr>
	<c:forEach items="${list }" var="item" varStatus="status">
		<tr>
			<td>${item }</td>
			<td>${status.index }</td>
			<td>${status.count }</td>
			<td>${status.begin }</td>
			<td>${status.end }</td>
			<td>${status.step }</td>
			<td>${status.first }</td>
			<td>${status.last }</td>
			<td>${status.current }</td>
		</tr>
	</c:forEach>
</table>
</body>style 도 있고, 이번에는 테이블


루프정보를 담는 객체를 저장할 변수명을 값으로 갖는다
여기 forEach 에서는 해당 값을 이용해 현재 처리중인 인덱스, begin, end 속성값 등을 구할 수 있다
23varStatus
<%
pageContext.setAttribute("data", new String[] {"water", "jeju", "seoul", "paris", "milk"});
%>
<ul>
	<c:forEach items="${data }" var="item" varStatus="status" begin="2" end="3">
		<li>${status.count } : ${item }</li>
	</c:forEach>
</ul>

<hr>
<ul>
	<c:forEach items="${data }" var="item" varStatus="status" begin="2" end="3">
		<li>${status.count } : ${data[status.index] }</li>
	</c:forEach>
</ul>리스트로 배열 반환
varStatus = "status"
24foreach
<%
List<Bean06> list = new ArrayList<>();
list.add(new Bean06("java", "kim", 10000));
list.add(new Bean06("react", "lee", 15000));
list.add(new Bean06("jsp", "park", 20000));
list.add(new Bean06("vue", "choi", 25000));
list.add(new Bean06("spring", "son", 30000));
list.add(new Bean06("mysql", "cha", 35000));

request.setAttribute("books", list);
%>
<h3>결과</h3>
<table>
	<tr>
		<th>#</th>
		<th>제목</th>
		<th>저자</th>
		<th>가격</th>
	</tr>
	<tr>
		<td>1</td>
		<td>java</td>
		<td>kim</td>
		<td>10000</td>
	</tr>
	<tr>
		<td>2</td>
		<td>react</td>
		<td>lee</td>
		<td>15000</td>
	</tr>
	<tr>
		<td>3</td>
		<td>jsp</td>
		<td>park</td>
		<td>20000</td>
	</tr>
	<tr>
		<td>4</td>
		<td>vue</td>
		<td>choi</td>
		<td>25000</td>
	</tr>
	<tr>
		<td>5</td>
		<td>spring</td>
		<td>son</td>
		<td>30000</td>
	</tr>
	<tr>
		<td>6</td>
		<td>mysql</td>
		<td>cha</td>
		<td>35000</td>
	</tr>
</table>
<hr>

<h3>forEach</h3>

<table>
	<tr>
		<th>#</th>
		<th>제목</th>
		<th>저자</th>
		<th>가격</th>
	</tr>

	<c:forEach items="${books }" var="book" varStatus="status">
		<tr>
			<td>${status.count }</td>
			<td>${book.title }</td>
			<td>${book.writer }</td>
			<td>${book.price }</td>
		</tr>
	</c:forEach>
</table>
위는 직접 작성, 아래는 foreach 로 간단히 출력
25bookform, delete, list-book, list-book-tag, modify, modify-process, process
bookform
<h1>책 등록</h1>
<form action="25process.jsp" method="post">
	<input type="text" name="title" placeholder="책 제목">
	<br>
	<input type="text" name="writer" placeholder="저자">
	<br>
	<input type="number" name="price" placeholder="가격" value="0"> 원
	<br>
	<input type="text" name="publisher" placeholder="출판사" >
	<br>
	<input type="number" name="stock" value="1"> 재고
	<br>
	<input type="submit" value="등록">
</form>

<br>

<a href="25list-book-tag.jsp">책 목록 보기</a>말그대로 입력창
delete
<%
List<Bean06> list = (List<Bean06>) application.getAttribute("books");
String indexStr = request.getParameter("index");
int index = Integer.parseInt(indexStr);

list.remove(index);

response.sendRedirect("25list-book-tag.jsp");
%>Bean06 list 만들기, books 를
index 는 indexStr 에 저장한 뒤 형변환해서 index 로 다시 저장
list 에서 index 삭제
list-book-tag 로 리디렉트
list-book
<h1>책 목록 (${fn:length(books) } 권)</h1>
<a href="25book-form.jsp">책 등록하기</a>
<c:if test="${empty books }">
<p>아직 저장된 책이 없습니다.</p>
</c:if>
<c:if test="${not empty books }">
<table class="table table-hover">
<thead>
<tr>
<th></th>
<th>#</th>
<th>제목</th>
<th>저자</th>
<th>가격</th>
<th>출판사</th>
<th>재고</th>
</tr>
</thead>
<tbody>
<c:forEach items="${books }" var="book" varStatus="status">
<tr>
<c:url value="25delete.jsp" var="deleteUrl">
<c:param name="index" value="${status.index }" />
</c:url>
<c:url value="25modify.jsp" var="modifyUrl">
<c:param name="index" value="${status.index }" />
</c:url>
<td>
<button type="button" class="btn btn-primary" data-toggle="modal" data-target="#exampleModal">
<i class="fas fa-trash-alt"></i>
</button>
<a href="${modifyUrl }" class="btn btn-secondary">
<i class="fas fa-edit"></i>
</a>
</td>
<td>${status.count }</td>
<td>
<c:out value="${book.title }" />
</td>
<td>
<c:out value="${book.writer }" />
</td>
<td>
<c:out value="${book.price }" />
</td>
<td>
<c:out value="${book.publisher }" />
</td>
<td>
<c:out value="${book.stock }" />
</td>
</tr>
</c:forEach>
</tbody>
</table>
</c:if>
<div class="modal fade" id="exampleModal" tabindex="-1" aria-labelledby="exampleModalLabel" aria-hidden="true">
<div class="modal-dialog">
<div class="modal-content">
<div class="modal-header">
<h5 class="modal-title" id="exampleModalLabel">Modal title</h5>
<button type="button" class="close" data-dismiss="modal" aria-label="Close">
<span aria-hidden="true">×</span>
</button>
</div>
<div class="modal-body">...</div>
<div class="modal-footer">
<button type="button" class="btn btn-secondary" data-dismiss="modal">Close</button>
<button type="button" class="btn btn-primary">Save changes</button>
</div>
</div>
</div>
</div>
<script src="https://cdn.jsdelivr.net/npm/jquery@3.5.1/dist/jquery.slim.min.js" integrity="sha384-DfXdz2htPH0lsSSs5nCTpuj/zy4C+OGpamoFVy38MVBnE+IbbVYUew+OrCXaRkfj" crossorigin="anonymous"></script>
<script src="https://cdn.jsdelivr.net/npm/bootstrap@4.6.1/dist/js/bootstrap.bundle.min.js" integrity="sha384-fQybjgWLrvvRgtW6bFlB7jaZrFsaBXjsOMm/tB9LTS58ONXgqbR9W8oWht/amnpF" crossorigin="anonymous"></script>list-book-tag
<h1>책 목록 (${fn:length(books) } 권) w/ TAG</h1>
<a href="25book-form.jsp">책 등록하기</a>
<c:if test="${empty books }">
<p>아직 저장된 책이 없습니다.</p>
</c:if>
<c:if test="${not empty books }">
<my:t20table />
</c:if>
<div class="modal fade" id="exampleModal" tabindex="-1" aria-labelledby="exampleModalLabel" aria-hidden="true">
<div class="modal-dialog">
<div class="modal-content">
<div class="modal-header">
<h5 class="modal-title" id="exampleModalLabel">Modal title</h5>
<button type="button" class="close" data-dismiss="modal" aria-label="Close">
<span aria-hidden="true">×</span>
</button>
</div>
<div class="modal-body">삭제하시겠습니까?</div>
<div class="modal-footer">
<button type="button" class="btn btn-secondary" data-dismiss="modal">취소</button>
<a id="modal-accept-button1" href="#" class="btn btn-primary">확인</a>
</div>
</div>
</div>
</div>
<script src="https://cdn.jsdelivr.net/npm/jquery@3.5.1/dist/jquery.slim.min.js" integrity="sha384-DfXdz2htPH0lsSSs5nCTpuj/zy4C+OGpamoFVy38MVBnE+IbbVYUew+OrCXaRkfj" crossorigin="anonymous"></script>
<script src="https://cdn.jsdelivr.net/npm/bootstrap@4.6.1/dist/js/bootstrap.bundle.min.js" integrity="sha384-fQybjgWLrvvRgtW6bFlB7jaZrFsaBXjsOMm/tB9LTS58ONXgqbR9W8oWht/amnpF" crossorigin="anonymous"></script>
<script>
$(document).ready(function() {
$(".delete-modal-button").click(function() {
let href = $(this).attr("data-href");
$("#modal-accept-button1").attr("href", href);
});
});
</script>modify
	<c:set value="${applicationScope.books[param.index] }" var="book" />

	<div class="container">
		<a class="btn btn-secondary btn-block" href="25list-book-tag.jsp">책 목록 보기</a>
		<h1>책 수정</h1>
		<div class="row ">
			<div class="col-6">
				<form action="25modify-process.jsp" method="post">
					<input type="hidden" name="index" value="${param.index }">
					<div class="form-group">
						<label for="titleInput1">책 제목</label>
						<input type="text" name="title" class="form-control" id="titleInput1" value="${book.title }">
						<small id="titleHelp" class="form-text text-muted">책 제목을 입력해주세요.</small>
					</div>
					<div class="form-group">
						<label for="writerInput1">작성자</label>
						<input type="text" name="writer" class="form-control" id="writerInput1" value="${book.writer }">
					</div>
					<div class="form-group">
						<label for="priceInput1">가격</label>
						<input type="number" name="price" class="form-control" id="priceInput1" value="${book.price }">
					</div>
					<div class="form-group">
						<label for="publisherInput1">출판사</label>
						<input type="text" name="publisher" class="form-control" id="publisherInput1" value="${book.publisher }">
					</div>
					<div class="form-group">
						<label for="stockInput1">재고</label>
						<input type="number" name="stock" class="form-control" id="stockInput1" value="${book.stock }">
					</div>
					<button type="submit" class="btn btn-primary">수정</button>
				</form>

			</div>
		</div>
	</div>

	<script src="https://cdn.jsdelivr.net/npm/jquery@3.5.1/dist/jquery.slim.min.js" integrity="sha384-DfXdz2htPH0lsSSs5nCTpuj/zy4C+OGpamoFVy38MVBnE+IbbVYUew+OrCXaRkfj" crossorigin="anonymous"></script>
<script src="https://cdn.jsdelivr.net/npm/bootstrap@4.6.1/dist/js/bootstrap.bundle.min.js" integrity="sha384-fQybjgWLrvvRgtW6bFlB7jaZrFsaBXjsOMm/tB9LTS58ONXgqbR9W8oWht/amnpF" crossorigin="anonymous"></script>modify-process
<%
// 1. request 파라미터 수집
String indexStr = request.getParameter("index");
String title = request.getParameter("title");
String writer = request.getParameter("writer");
String priceStr = request.getParameter("price");
String publisher = request.getParameter("publisher");
String stockStr = request.getParameter("stock");
int index = Integer.parseInt(indexStr);
int price = Integer.parseInt(priceStr);
int stock = Integer.parseInt(stockStr);

// 2. application books attribute 수정 (db 수정)
List<Bean06> books = (List<Bean06>) application.getAttribute("books");
Bean06 book = books.get(index);
book.setTitle(title);
book.setWriter(writer);
book.setPrice(price);
book.setPublisher(publisher);
book.setStock(stock);

// 3. redirect
response.sendRedirect("25list-book-tag.jsp");

%>process
<%
// 1. 파라미터로 받은 값을 bean06 객체로 만들어서
String title = request.getParameter("title");
String writer = request.getParameter("writer");
String priceStr = request.getParameter("price");
String publisher = request.getParameter("publisher");
int price = Integer.parseInt(priceStr);
String stockStr = request.getParameter("stock");
int stock = Integer.parseInt(stockStr);

Bean06 book = new Bean06(title, writer, price, publisher, stock);

// 2. application영역에 저장 (db 저장)
List<Bean06> list = (List<Bean06>) application.getAttribute("books");
if (list == null) {
	list = new ArrayList<>();
	application.setAttribute("books", list);
}
list.add(book);


// 3. 25list-book.jsp로 redirect
response.sendRedirect("25list-book-tag.jsp");
%>
26out
<h1>jstl out tag</h1>
<c:out value="hello"></c:out>
<hr>
<%
pageContext.setAttribute("attr1", "javascript");
%>
<c:out value="${attr1 }"></c:out> <br>
<c:out value="${attr2 }" default="없음" ></c:out> <br>
<c:out value="${attr1 }" default="없음" ></c:out> <br>

<c:out value="${attr2 }">값 없음</c:out> <br>
<c:out value="${attr1 }">값 없음</c:out>

<hr>
<%
pageContext.setAttribute("attr3", "<script>alert('핵!!!');</script>");
%>

${attr3 } <br>
<c:out value="${attr3 }" /><c:out value="">
out 태그: JspWriter 에 데이터를 출력할 때 사용되는 태그
- value: JspWriter 에 출력할 값을 나타냄. value 속성 값은 string 같은 문자열.
-default: value 속성에서 지정한 값이 존재하지 않을 때 사용될 값을 지정
-escapeXml: 이 속성값이 true 이면 entity 값 적용 기본값은 true
javascript 를 attr1 에 저장
<script>alert('핵');</script>

27url
<h1>jstl url tag</h1>

<hr>
<a href="https://www.naver.com">네이버1</a>
<br>
<a href="https://www.naver.com">네이버2</a>
<hr>
<c:url value="https://www.naver.com" var="naverUrl" />
<a href="${naverUrl }">네이버3</a>
<br>
<a href="${naverUrl }">네이버4</a>
<hr>
<c:url value="25book-form.jsp" var="addBookUrl" />
<a href="${addBookUrl }">책 추가하기</a>
<br>
${addBookUrl }
<hr>
<c:url value="25book-form.jsp" />
<hr>
<a href="<%= request.getContextPath() %>/12jstl/25book-form.jsp">책 추가하기</a>
<br>
<a href="<c:url value="/12jstl/25book-form.jsp" />">책 추가하기 </a>
<br>
<c:url value="/12jstl/25book-form.jsp" var="addBookUrl2"/>
<a href="${addBookUrl2 }">책 추가하기</a><c:url value="(해당 링크)" var="" />
<a href="${naverUrl }"> - 이거 위에서 설정한 var 이름, 링크 걸림
<c:url value="(이클립스 내 파일명/혹은 경로)" var="">
${addBookUrl } 만 출력하면 아까 addBookUrl 로 var 걸어둔 value 출력

28url
<a href="25process.jsp?title=java&writer=lee&price=300&stock=10&publisher=apub">책 등록 처리</a>

<hr>

<c:url value="25process.jsp" var="addSpringBookUrl" scope="page">
	<c:param name="title" value="spring" />
	<c:param name="writer" value="son" />
	<c:param name="price" value="10000" />
	<c:param name="stock" value="22" />
	<c:param name="publisher" value="bpub" />
</c:url>

<a href="${addSpringBookUrl }">스프링 책 추가</a>뭐 링크걸어주기, 경로든 파일명이든
대신 scope 가 생겼다 scope="page"
그리고 <c:param name="" value="" />
29url-ex
없음
30set
<c:set>: el 변수의 값이나 el 변수의 property 값을 지정할 때 사용됨
사용방법1, el 변수를 생성하는 것
- var: 값을 저장할 el 변수의 이름을 지정
- value: 변수의 값을 지정. 표현식, el, 정적인 텍스트를 사용하여 값 지정 가능
- scope: 변수를 저장할 영역을 지정. 값으로 page, request, session, application 중 하나가 가능. 기본값은 page.
사용방법2, 객체의 property 값을 설정하는 것
- target: property 값을 설정할 대상 객체를 지정. 표현식(<%= %>)이나 el 변수(${varName }) 를 사용할 수 있음. 대상 객체는 자바빈 객체나 map 이어야 함
- property: 설정할 property 이름을 지정. target 이 자바빈 객체일 경우, property 이름에 해당하는 set 메소드를 제공해야함. (ex. property 이름이 name 인 경우, target 객체는 setName() 메소드를 제공해야 함. map 인 경우 map.put(property명, 값) 이용해서 값 설정.)
- value: property 값 지정
<%
pageContext.setAttribute("attr1", "val1");
request.setAttribute("attr2", "val2");
session.setAttribute("attr3", "val3");
application.setAttribute("attr4", "val4");
%>

<h1>jstl set tag</h1>
<c:set var="attr5" value="val5" />
${pageScope.attr1 } : ${pageScope.attr5 } <br>

<c:set var="attr6" value="val6" scope="request" />
${requestScope.attr2 } : ${requestScope.attr6 } <br>

<c:set var="attr7" value="val7" scope="session" />
${sessionScope.attr3 } : ${sessionScope.attr7 } <br>

<c:set var="attr8" value="val8" scope="application" />
${applicationScope.attr4 } : ${applicationScope.attr8 } <br>위에서 먼저, page, request, session, application 으로 값1, 2, 3, 4 저장

<c:set var="attr5" value="val5" /> - attr5 에 val5 저장
el 로 꺼낼 때는, ${pageScope.attr5 } - 영역.이름
31set
<c:set var="attr1" value="very looooooong value" />
${attr1 }

<br>

<c:set var="attr2">very looooooooooooooooooooooooooooong value</c:set>
${attr2 }
저장하고 꺼냄
저장하고 꺼냄 - 근데 이번에는 attribute 로 안쓰고 content 로 씀.
32set
<%
Bean06 book = new Bean06("java", "son", 300, "apub", 10);
pageContext.setAttribute("attr", book);
%>

수량 : ${attr.stock } <br>

<c:set target="${attr }" property="stock" value="11" />

수량 : ${attr.stock } <br>Bean06(String title, String writer, int price, String publisher, int stock) 이므로, stock 에 10이 저장됐음
attr 에 book 을 저장
따라서 attr.stock 을 출력하면 10
→ 이제, <c:set> 으로 property="stock" 의 값을 value="11" 로 바꿈
그리고 다시 출력하면 11
33function
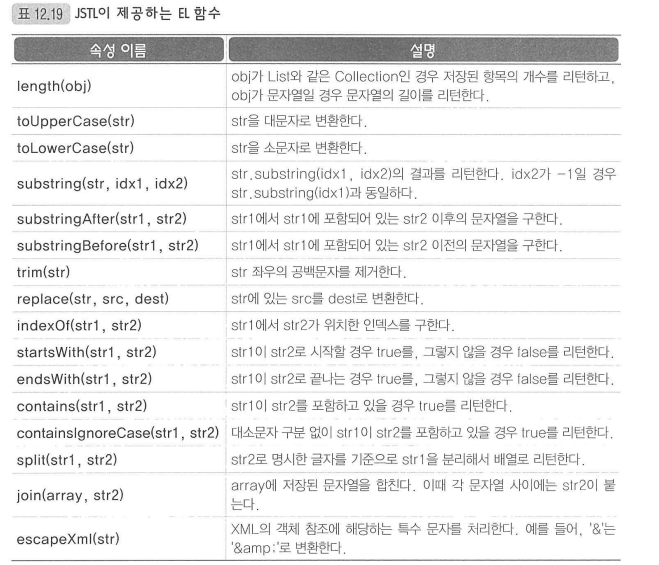
el 함수
★★추가해야 함수 사용 가능★★
<%@ taglib prefix="fn" uri="http://java.sun.com/jsp/jstl/functions" %>
<%
List<String> list = new ArrayList<>();
list.add("java");
list.add("jsp");
pageContext.setAttribute("list", list);
pageContext.setAttribute("str", "hello world");

Map<String, String> map = new HashMap<>();
map.put("a", "b");
pageContext.setAttribute("map", map);

%>

${fn:length(list) } <br>
${fn:length(str) } <br>
${fn:length(map) } <br>

<hr>
${list.size() } <br>
${str.length() } <br>
${map.size() } <br>

${map.get("a") } <br>

<hr>

<%
pageContext.setAttribute("str1", "hello world");
pageContext.setAttribute("str2", "hello <br> world");
%>

${str1 } <br>
${str2 } <br>
${fn:escapeXml(str2) } <br>
'course 2021 > JSP' 카테고리의 다른 글
| JSP17 - 14bootstrap (0) | 2021.11.25 |
|---|---|
| JSP16 - 13customTag (0) | 2021.11.24 |
| JSP14 - 11el(3) (0) | 2021.11.21 |
| JSP13 - 11el(2) (0) | 2021.11.20 |
| JSP12 - 11el (0) | 2021.11.19 |